

Mission #5
A HOLE IN THE WORLD

A note on "Zero Residual Presence" play style. This level's design makes it virtually impossible to play without a lot of at least nonlethal takedowns, at least if you want to collect all bone charms. This guide assumes that you want to kill or stun all cultists you encounter, and will occasionally suggest alternative strategies to avoid or sneak around them... but those are in short order here, so be forewarned.
-
Speak to the Outsider. Go outside. Displace or climb up to the low roof on the right, and snipe the three hounds.
-
On the left side are a workshop with a boarded up window, where you can get a bone charm (1/27) on a shelf; and the miners' barracks, where you can get a bone charm (2/27) from the locker on the second floor.
-
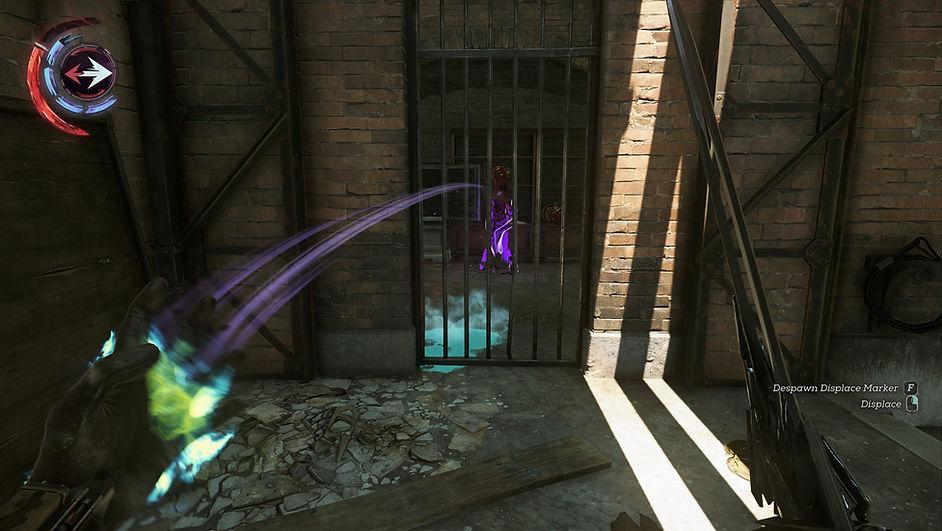
On the right side is the engine room, which you can enter via the covered bridge or the open solarium roof. Turn the crank wheel. Immediately use Foresight. Set a Displace marker inside the whale oil room. Complete the Displace and collect a bone charm (3/27) and some loot from the safe.
-
NP. There is no way to get this bone charm.
-
ZRP. If you want to avoid the hounds instead of killing them, climb all the way up to the roof of the engine room, cross over to the barracks via the large copper pipes, and get down on the other side near the statue.
-
-
Go past the statue. Hug the wall at right, climb on the train car, and jump or Displace to the sign over the gate. Get down on the other side. Wait for the cultists to kill Antero. Stun both and get a bone charm (4/27).
-
ZRP. Instead of waiting for them to kill Antero, get down on the other side while they're still at it, pickpocket the bone charm from the male cultist, and sneak in the door behind the female one while she shoots Antero.
-
-
Enter the mining station at left. Walk upstairs. Displace or climb up to the crawlspace just under the ceiling and cross over to the other side. Get the Gate Combination from a book.
-
There's a boarded-up door up high. Either jump to it or turn the crank wheel to raise the rails and quickly Displace up. Inside this room is a bone charm (5/27). Use this window instead of the gate to go to the mine's entrance.

-
Stun the four cultists in the courtyard below in this order: on the roof of the workshop, on the ground by the crank wheel, sitting on the stairs, sweeping by the train car. Get two bone charms (6-7/27).
-
ZRP. The charms are on the sitting cultist and on the crank-wheel one. Pickpocket the former after he's done talking to the sweeping cultist. Hide behind the toppled-over train car, walk to the workshop, and pickpocket the crank-wheel cultist while the roof cultist walks away. Finally climb up to the roof of the workshop via the pipes, break the wooden planks, and quickly dip inside: the roof cultist will be alerted but not see you.
-
The Mine
-
There are two ways into the mine:
-
Elevator. Bring three bodies to the ramp. Power it with a whale oil tank from the crawlspace below (this step was removed in later versions of the game). Push the red button. This puts you right at the mine's entrance.
-
Workshop. Enter via the boarded-up window and climb all the way upstairs. This puts you at the entrance of the large covered bridge you see overhead. Below I follow this route.
-
-
In the workshop, listen to the four cultists talk. Stun the man leaning over the railing when he walks behind the planks. Displace up to the pipes by the ceiling. Draw the women to one spot with a voltaic shot. Use a hyperbaric grenade to take them all out, making sure that the fall doesn't kill them. Get two bone charms (8-9/27).
-
NP. The strategy is the same, but it's harder. You may be best served by drawing all four to one spot and using a hyperbaric grenade. A good place to stand is inside the the covered bridge, far enough that they don't see you.
-
ZRP. The bone charm on the woman in the middle of the floor is hard to get. I recommend you distract them by shooting to the chamber behind the workshop, near the top of the stairs where you just came in. Now heir patrol roots are randomized, so save/reload until the one you want is isolated enough for you to pickpocket the bone charm. The one on the man leaning over the realing is easier: wait until he's closest to the covered bridge and sneak behind him on your way out.
-
-
Walk up the covered bridge and crawl into the train car. See the Envisioned cross over. Ignore or stun the cultists as they walk away and get a bone charm (10/27) from one of them.
-
Go right from where the cultists were sitting. Follow the catwalk to the door with the red HALT sign.
-
Enter the living quarters and go upstairs. Quickly get into the bedroom at the far end. Get a bone charm (11/27). Hide inside the cage behind the largest bed and wait for a cultist to walk in: swipe another bone charm (12/27).
-
Another bone charm (13/27) is on the female cultist who's seeping down below, near Melchiodi's locked cell. To get it, either stun them all, or wait until the two male cultists upstairs aren't looking, then go in and out quickly.
-
Go through the open window on the top floor. Drop down below. Pickpocket a bone charm (14/27) from one of the sitting cultists: stunning them now is messy, but you'll get a chance later. Ignore the speaker and his audience.
-
Displace or sneak to the hole in the floor below the broken stairs on the right. Emerge on the other side.
-
There are 13 cultists in this large area. I suggest that you stun them all. This is the best order I've found:
-
Man leaning on the bookcase at left. Collect a bone charm (15/27).
-
Man pacing on the catwalk. Collect a bone charm (16/27).
-
Woman leaning over the catwalk's railing. Collect a bone charm (17/27).
-
Woman on the stairs on the right taking pictures.
-
Man sitting in the offices below the catwalk.
-
Man leaning on the railing by the crates, looking at the shivering projection. Collect a bone charm (18/27).
-
Pair sitting right in front of the shivering projection. Collect a bone charm (19/27).
-
Man leaning on the railing among the stacks at left, via the chandelier. Collect a bone charm (20/27).
-
Woman he's looking at among the stacks.
-
Trio in the offices: toss a hyperbaric grenade from the chandelier. Collect a bone charm (21/27).
-
Good places to hide all these bodies: on top of chandeliers, in the crawlspace under the stairs that you used to get here (but make sure they don't drown), or on the roof between the library and the greenhouse.
-
ZRP. As mentioned in the introduction, this is extremely difficult, because the level wasn't designed to play like this. It is possible, though. The sequence is similar, but just pickpocket the bone charms instead of doing nonlethal takedowns. A good place to get the charms from the cultists near the projector is to hide by the rocks under the railing: there are a couple of spots where no one can see you, and from where you can get in and out quickly a few times to get the charms. Again, this is extremely time-consuming.
-
-
Go to the greenhouse. Look through a window to the area below where the audience was listening to the speaker.
- Make a noise from the window. If the cultists congregate in one place, stun them with a hyperbaric grenade. Otherwise, pick them out one by one. Collect two bone charms (22-23/27). Return to the dormitories. Stun the speaker by dropping from above when he's sitting down. Stun the two women sitting with a hyperbaric grenade.
-
ZRP. A good place to get these bone charms from is the large crane, from where you can get down and back up quickly after pickpocketing a charm. This, too, requires perfect timing and a lot of trial and error.
-
-
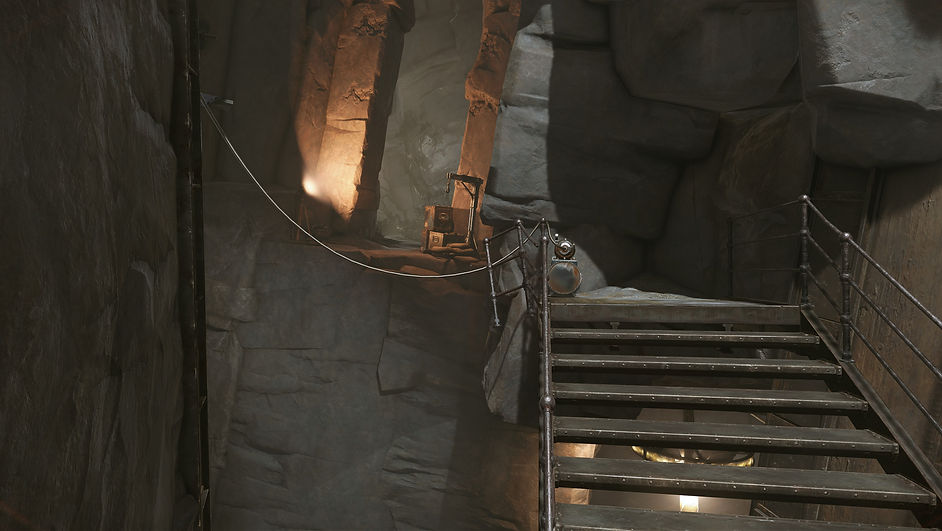
Follow the catwalk over the library to the end. Displace or run-jump to the ledge with the light, as shown below:
-
ZRP. If you haven't stunned any of the cultists, there are up to three here at any given time, which makes doing this all but impossible...
-
The Void
-
Wait for the two cultists to finish talking. Stun them both. Get a bone charm (24/27) from one.
-
ZRP. When they're both looking away, hug the wall at left, pickpocket the charm, and climb up quickly.
-
-
Climb up to the crawlspace with the Eye and enter the Void.
-
Get Melchiodi's Key from his body. Go around the Envisioned coming up the slope and make your way down.
-
To kill an Envisioned, you must first stun it and then perform an assassination. To stun it, either Displace tright into it (but this causes a detection) or hit it with a heavy weapon (grenade, sticky grenade, or springrazor with a Double Release upgrade). When you assassinate it, make sure you do so from behind to avoid a detection.
-
-
Still in the Void, return to the dormitories. If you stunned everyone, there should be very few cultists here.
-
Open Melchiodi's cell with his key. Read his notes and get a bone charm (25/27). The combination to his lockbox is the name of the Outsider, as per the primer on the wall. In the case below, for example, it's 962.
-
ZRP. The only way to return here without powers and without nonlethal stuns is tricky. From Melchiodi's body, look down into the abyss and see that you can drop down to the covered bridge below. Find a spot that you can drop down to without dying; for me, it's usually by running and jumping on the right-hand wall, and then quickly grabbing the edge of the covered bridge when it's in range. Be careful not to be spotted by the two cultists and the Envisioned on the ledge high above you. Once you're on the covered bridge, drop further down to ground level: you may use the elevator shaft to do so. Return to the workshop with the boarded-up window that you smashed early in the level, go all the way back around to the covered bridge from inside, crawl through the train car, and go up the slope to the dormitories. Distract the cultists here and get into Melchiodi's room.
-

-
The last two bone charms (26-27/27) are on the cultists examining the Void-altered chair near the photographic equipment, on the ledge high above the covered bridge. There are usually one or two Envisioned here, too.
-
Get down to ground level, near where you entered the quarry in the first place. Avoid the Envisioned and go left.
-
Meet Daud and the Outsider. Make your choices.
THE END