

Part One
Neuromod Division and Lobby
ACHIEVEMENTS
This guide discusses all possible strategies, but pays special attention to the most popular achievements:
-
No Needles. Install no neuromods ("no powers").
-
I and Thou. Save every human on Talos I. They must survive through the end of the game.
-
I and It. Kill every human on Talos I. The kill shot must come from you, not by anything else.
SIDE OBJECTIVES
Side objectives progress is marked by gold text; e.g., The Corpse Vanishes.
SPOILERS
Prey requires frequent backtracking to unlock new areas. For example, an entire section of the Neuromod Division (the starting area) only becomes available 4-6 hours later. The parts of the guide that cover such areas are identifiable by a red background, so you can avoid spoilers at will.
COLLECTIBLES
This guide keeps track of neuromods, keycards, passwords, codes, transcribes, and fabrication plans, but not of bodies, chipsets, or computer terminals, unless strictly necessary.
Your Apartment (Neuromod Division)
-
Wear the suit and go out to the hallway and to the helicopter. Ignore everything in your apartment.
-
Do the tests as instructed. It doesn't matter how well you do or which options you pick.
-
After the cutscene, wear the suit again and this time loot the apartment, including some food and some junk.
-
Get the Wrench from Patricia Varma's corpse in the hallway. Smash the window in your apartment to escape.
-
There are two mimics disguised as objects; typically, one is among the stacks behind the apartment and the other is near the cubicles. Kill them both with the wrench.
-
Go to the room called Simulation Debriefing with the scary-looking chair. Climb the cabinet at left and get loot from a briefcase, including a Stun Gun with ammo.
-
The code for the safe here (5150) is scribbled on the whiteboard, and will also be found later. It has minor loot.
-
Exit to the roof with the chopper, go left, and enter the TranStar Offices. Look at the monitor inside the security booth and click on Reset Simulation, or click Confirm inside the elevator.
-
Fun fact. If you drop an item on the roof of your apartment complex the first time around, before it's revealed that it was all a simulation, you will find it in the same exact spot on the roof of the TranStar building! This is one of many hints that it's a simulation. Others are skid marks on the floor, some Looking Glass glitches, etc.
-
-
Kill the mimic in test room B after smashing the glass. Collect Marco Simmons' Transcribe from the table.
-
Upstairs, kill two mimics at the end of the catwalk, overlooking the chopper. One is typically disguised as a mug and the other as a computer terminal.
-
Go through the glass doors and witness Gravilovich's death. Proceed to the sim lab offices. There are four mimics here: one is a chair in the far-left cubicle, one a stool on the right near three other stools, and the other two are variable but one is usually a box. Grab the Simulation Lab Keycard from Bellamy's desk.
-
The Corpse Vanishes. Start this mission by reading an email on Gravilovich's terminal as soon as you walk in.
-
-
Leave the sim lab via the door or via the vent shaft on the right on top of the tape drive. ignore the phantom.
-
Go left and grab the GLOO Cannon near Veer Singh's corpse. Climb up on the security booth and see five mimics down in the lobby. One or two typically disguise as red buckets. My strategy is to gloo the ones that are roaming freely, then kill the mimicked ones one by one.
-
In the Conference Room at left there is minor loot, possibly a mimic, and Robert Gage's Transcribe.
-
Grab the first Neuromod from the display case.
-
Repair I is the most useful early skill, as it lets you repair grav shafts and weapons.
-
-
One of the restrooms has minor loot and a disguised mimic; the other is currently inaccessible, but it has the same.
-
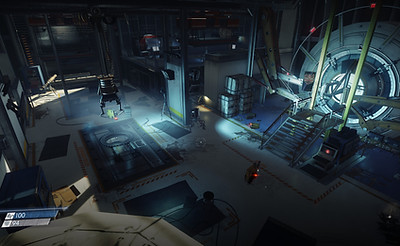
Shoot a gloo ball on one of the columns near the exit to the lobby, as in the picture below. Use it to climb to the balcony above. Grab another stun gun with ammo from near the volunteer's corpse.
-
There is much else to do here, but the next section of the Neuromod Division is only accessible after having visited Psychotronics. To avoid spoilers, you may click here to advance to the next playable section: Talos I Lobby.

-
As you return to the Neuromod Division after being in Psychotronics and starting Copy Protection, grab the Security Booth Keycode from Divya Naaz's body. The code is variable and changes with each play-through.

SIMULATION LAB (AGAIN)

-
In the sim lab offices are two mimics and a turret that can be dangerous if you installed typhon abilities.
-
In the sim lab itself is a phantom, an etheric phantom, 4-5 disguised mimics, and two corrupted operators.
-
Other than the new enemies, the only reason to go all the way back to the start is if you acquired Necropsy: the corpses of all the phantoms and mimics you killed on your way out are still here, so you can harvest them.
SKILL RECORDING
-
Kill two mimics inside the security booth. Unlock Skill Recorder access from the terminal's Utilities tab.
-
Enter the Skill Recorder area via the door by the exit to the lobby. Smash the windows and climb in. There is minor loot, but Joshua Vanstry's body under the stairs holds a neuromod. Go upstairs to the second level.
-
Kill the voltaic phantom and several mimics. In the lab are three neuromods and a MedBay.
VOLUNTEER QUARTERS
-
Exit Skill Recording on the second floor balcony. Kill a phantom and two mimics. Lift the crate near the dead volunteer with Leverage I, or toss a recycle charge.
-
Crawl through the maintenance hatch, climb up, and go right. There's minor loot on the glass ceiling.
-
Enter another hatch on the far right and drop down to the volunteer quarters. Go right into the locker rooms and kill two disguised mimics. Turn the power back on from the open maintenance hatch.
-
Shoot some gloo on the now electrified floor and go to the sleeping pods at right. Kill a disguised mimic.
-
Find a note in one pod that reveals the location of a stash: above the drop ceiling just outside this room.
-
Kill the Poltergeist that appears here. My strategy is to stun it and then Q-Beam it: it's very fast that way.
-
Enter the volunteer office behind the terminal and find useful loot, then crawl through the maintenance hatch.

NEUROMOD FABRICATION
-
Kill a mimic in the maintenance shaft and two more in the room with the corpse and two turrets.
-
Outside is a Technopath and three corrupted operators. A good strategy is to toss EMPs or spam Electrostatic Burst so the operators are out and you can kill the big guy with the Q-Beam.
-
The corpse below on the floor holds Halden Graves' Office Keycard.
-
Take the grav shaft back up and enter his office. Find Halden Graves' Transcribe and kill a greater mimic.
-
Copy Protection. Reset the neuromod licenses from Graves' terminal, under Utilities.
-
-
From his terminal you can also unlock exotic materials storage area. Once done, drop down to the room just below (next to the grav shafts) and loot the storage.
-
There is minor loot throughout this floor, plus a working Fabricator and a broken Recycler.


-
Toss a recycle charge on the grate in the corner of this room. Under the floor are two disguised great mimics and some more recycler charges.
-
You can also access the under-floor area by mimicking a small object next to the corpse that had Graves' card, and then dropping through the hole in the floor.
-
If playing without neuromods, these charges are good occasions to recycle some of your excess junk, since the recycler in this area is broken and you cannot repair it.
Talos I Lobby
-
Go downstairs and witness the explosion of the labs. There is much to do in the lobby, but it must be done piecemeal because your inventory space is insufficient to collect it all. Also, some areas are inaccessible until later.
RECOMMENDED PATH
-
Kill all enemies on the ground floor.
-
Loot Security Office.
-
Watch video in Morgan's Office.
-
Loot Trauma Center.
-
Loot literally everything in any accessible area.
-
Leave to Hardware Labs via Teleconferencing.
-
Main Lobby: ground floor
-
Lift Interference. Click on the elevator's panel to find out that it's offline and start the related side mission.
-
Get the Trauma Center Keycard from the front counter. There's a disguised mimic on the counter, too.
-
There are four disguised mimics near the TranStar Exhibit entrance: draw them out and let the turret kill them.
-
There is abundant junk throughout the lobby, but it can be done later when your inventory is larger.
-
-
Transtar Exhibit: ground floor
-
The phantom should be drawn out to the open so the turret can kill it. Grab a Neuromod from the \case.
-
Talos Smuggling Ring. One of the dead drops is here: the red siren by the exhibit's entrance. If you don't mind cheating a bit, you can hit it thrice with your wrench to get a neuromod and two Recycle Charges. This is pretty much mandatory on the Nightmare difficulty level, as any advantage helps.
-
-
Psychotronics Access Hall: ground floor
-
You can enter with the General Access Keycard, which you find later, or by smashing the window next to the terminal inside this room, reach over, and click on the terminal to unlock the doors.
-
The safe in here can only be opened with Hacking II and it contains four neuromods.
-
-
Security Office: ground floor
-
Climb atop the large yellow pipes at left, follow them through, and drop down into the office.
-
Grab the Shotgun and ammo open the safe with the combination from the book on Elazar's desk (0526). Inside the safe are an EMP Grenade, a Nullwave Transmitter, and the Shotgun Shells Fab Plan.
-
The code for the holding cell with the dead prisoner, Demetri Bowser, is in the note on this desk, too (1129).
-
There are four Neuromods in a briefcase hidden to the right of the main desk with the security terminal on it. Elias Black's character sheet for "Captain Stabfellow" is on this desk, too.
-
-
Employee Orientation: ground floor
-
There are four disguised mimics here: three are near the back entrance (one as a medkit, one as a psy hypo, one as a chair) and one just appears near the other door.
-
Talos Smuggling Ring. Just outside this room is another dead drop with a neuromod inside.
-
-
Trauma Center: first floor, right staircase
-
A good strategy to kill the thermal phantom and Garfield Langly's phantom is to place turrets just outside the Traums Center and/or a recycle grenade by the door. One turret is upstairs by Morgan's office; two more are on the ground floor. Alternatively, wait for the phantoms to walk by the explosive canisters, then blow them up.
-
The medical operator in Chris Wade's office can be repaired, or a new one can be ordered from the dispenser.
-
In the central area is the Medkit Fab Plan and a neuromod on Luther Glass on the operating table.
-
Dr. DeVries' office and the Secured Pharmaceuticals room are currently locked and will be accessible later.
-
Mathias Kohl's terminal holds: (1) the code to the nearby quarantine cell; (2) records of sessions with Sarah Elazar, Danielle Sho, and Lorenzo Calvino; and (3) a button to start the test nearby, which you'll use later.
-
In the quarantine cell is a mind-controlled Trevor J. Young. Incapacitate or kill him.
-
I and Thou. Simply open the door and shoot him with the stun gun before he sees you.
-
I and It. Just kill him however. It doesn't count if he blow himself up attacking you: you have to kill him.
-
-
One section in the Trauma Center is only accessible later: read the red box just below for the guide to it. To avoid spoilers, you may click here to advance to the next playable section instead.
-


DEVRIES' AND KOHL'S OFFICES

-
Get three neuromods from Dr. DeVries' safe; the code (7324) is scribbled in Trevor Young's containment cell.
-
Do No Harm. Download the decryption key from DeVries' terminal, then go to Kohl's office next door.
-
Click on "Begin New Test" under Utilities and take the test on the other terminal. The answers are A-C-B-A-C.
-
A safe is revealed on the wall. Get three neuromods and the decrypted Morgan's session with Dr. Kohl.

-
Human Resources: first floor, left staircase
-
Can only be accessed if you either have Leverage III or toss a recycle charge on the obstructions. Minor loot throughout, plus two neuromods. A filing cabinets in Thomas Tucker's office is a disguised mimic.
-
-
I.T. Security: first floor, left staircase
-
Can only be accessed if you either have Hacking II or drop in from the glass ceiling above later during the main quest. This room contains a neuromod, the Security Office Keycard, and three phantoms, which are killed easily by detonating the explosive canisters.
-
The locked closet is and will remain inaccessible. Inside are four survivors that may become activated during a future mission. An early exploit that allowed you to walk through this door has since been patched.
-
-
Staff Lounge: first floor, mezzanine
-
Can only be accessed via I.T. Security or by jumping up to the balcony between the two staircases. There's a disguised mimic on the floor. Inside the lounge are four disguised mimics: two are stools, one is a chair, and one is an ashtray. There's also a working recycler here, a lot of food, and Octavia Figgs' Transcribe.
-
-
Sales Division: second floor, left staircase
-
Can only be accessed with Hacking II or via Teleconferencing by crossing the glass bridge to the other side.
-
Kill Yuri Kimura's phantom inside, plus two disguised mimics in the cubicles: one as a chair and one as a box.
-
Stolen Neuromods. Find the stolen neuromods on a desk in the back of this office.
-
-
Morgan Yu's Office: second floor, right staircase
-
The code to the door is on Jason Chang's computer just outside, whose password is on a sticky note.
-
Speak to January, watch the first part of the video, and grab the Teleconferencing Keycard from the desk.
-
In the safe on the wall is a weapon upgrade kit and the GLOO Canister Fab Plan.
-
If you purchased the pre-order edition of Prey, the locker in the corner contains some neuromods, a chipset, some materials, the Shotgun Shells Fab Plans, and The Margrave shotgun, which is super useful.
-
During a New Game+ play-through, this locker also contains a Psychoscope, if previously acquired.
-
-
-
Teleconferencing: second floor, right staircase
-
Enter with the keycard you got from Morgan's office.
-
There are three mimics by Elias Black's body, including one disguised as a pistol. Shoot them or lure them out to the turret by Morgan's office. Grab the 9mm Pistol from near the body.
-
Exiting on the other side of this office leads to the Hardware Labs.
-