

Guide: "Dark Fall 2: Lights Out" (2004)
- Feb 2, 2017
- 9 min read
Updated: Aug 2, 2018

TREWARTHAN, 1912
Look around the room and see the pictures. Read Benjamin Parker's diary and experience a past event in Demarian's house.
Look in the pantry. Open the box on the right, read the diary, and get the Hadden Industries floppy disk. Get the projector in the bottom cabinet of the shelves and watch some pictures of the town life. Go out to the outhouse and read some papers in the toilet.
Back in the present. Leave the house and go forward toward the docks. Meet Demarian on the right and talk to him. Accept the job and be conciliatory to get as many information as possible about the lighthouse. Go down to the docks and get on the boat to get to the island.
FETCH ROCK LIGHTHOUSE, 1912
Go right, straight, left, straight, right to get to the stairs. Climb all the way up. Switch on the emergency lightning on the wall opposite the anemometer.
Walk in the house. Go downstairs to the boiler room. Turn around and face the stairs. Zoom in at the bottom, turn on the lantern, and pick up the floor plan with instructions on how to turn on the boiler. Go to the coal room at left. The same instructions are behind the blower.
Original Edition. Instead of the instructions, you find a series of dots and ships that you must match to find out the order in which to press the levers and buttons. The actual order is the same in both editions.


Go to the back of the boiler, using the lantern. Press the middle, right, and left levers. Return to the coal room and press the middle, bottom, and top taps. The lights turn on. Go to the storage room and up the stairs.
First floor stairs. Nothing to do, but look around to learn about the lighthouse keepers. I won't reference much of the story in this walkthrough, so as to not give any more spoilers than strictly necessary.
First floor crew room. Open the crate on the floor at left, by the pantry. Move the clothes to reveal a secret compartment and get the code to Drake's room:

Second floor stairs. Nothing. Look around.
Second floor crew room. Nothing. Look around and learn about the keepers.
Third floor stairs. Press the buttons on Drake's room's door to enter. The sequence is given by the code found in the crew's room.
Third floor crew room (Drake's room). Open the closet and move the clothes to reveal a secret panel; nothing you can do with it now. Turn over the two pictures of Drake's children and read their ages: 19 and 21.
Original Edition. The ages are different: 18 and 24
Light up the painting over the bed and click on the upper-left corner to reveal a secret button. Press it and the bottom drawer under the bed opens. Read Drake's notes on a (future) color puzzle and learn the location a secret passage.


Go back downstairs and to the emergency lightning switch. Find the passage as per Drake's map. Go down the ladder and follow the walkway until the end.


Walk into the cave. Go right and to the bottom of the cave. Witness some weird color show: you're now in the year 2004!
FETCH ROCK LIGHTHOUSE, 2004
Leave the cave the way you had entered in 1912. Look around the picnic area and WWII exhibit. Use the floppy disk on the laptop to hear a ghostly recording.
Go past the ticket counter and to the dock. Look at the red tank, then left, and then zoom in on the base of the antenna to see a symbol. You will see eight in this time period; I discuss them below.
Original Edition. Some symbols are different, but that's irrelevant to the puzzle solution discussed below.
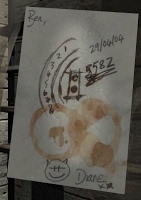
Pick up a spear from beside the red tank. Return to the ticket counter and use the stick to get a note from Diane to Ben that shows the first two digits of the access code to the lighthouse: 55.
Original Edition. The note contains the whole code: 5582.

Go to the cafe area and see a symbol on the right side of the trash can.
Go to the toilet area. In the ladies' restroom, find a symbol in the right-hand stall. Go out and to the gents' restroom on the other side. Find the same symbolunder the sink. Look on the floor by the urinals and find some coins under the coffee cup lid.
Return to the telescope in the picnic area and use the coins on it. Pan right until you see a symbol on a wall of the lighthouse.
Climb the stairs to the lighthouse. Access the touch-screen panel on the left. Browse it to the end until the program crashes. Note the last two digits of the access code: 64.
Original Edition. The panel isn't clickable.

Go up to the visitor center. By now you know that the code is 5564.
Original Edition. Again, the code is 5582.
Explore and read everything. In the book "Horror at Fetch Rock" are hints to the code to Drake's closet. It says that the code for the safe in his closet is the sum of the ages of his children, plus a prefix that has to do with a "white cove." We know that Drake's son and daughter were 19 and 21 in 1912, meaning they were born in 1893 and 1891. The sum is 3784. As for the prefix, look in the book of Cornish names and find that the word for "white cove" is "Portquin," which starts with a P. Therefore, P3784 is the code to the safe in Drake's closet.


Original Edition. The book also tells you the prefix directly, and it's "R." Since Drake's children's ages are different, the code is also different: 1912 - 19 = 1894, and 1912 - 24 = 1888. Thus: 1894 + 1888 = R3782.

Enter the lighthouse proper via the old boiler room. Look around and explore everything. Look at pictures (and take one of yourself) from the camera in Polly White's backpack. By reading her notes you learn there are goggles to be found.
Original Edition. Also read a note in Polly's diary about an old method of communication: one knock for yes, two knocks for no.

There are two more symbols here in the old boiler room: at the bottom of the archway leading to the old store room and at the bottom-right of the archway from inside the old coal room. Light them up with your lantern to see them.
First floor. Nothing to do now. Look around.
Second floor. Nothing to do now. Look around.
Third floor. See a symbol behind the bell on the right-hand wall. Polly locked herself in what used to be Drake's room. Zoom in on the bottom of the door and she passes you a map of Fetch Rock:
Original Edition. Polly asks you two questions: answer "yes" and "no" respectively, using one knock on the left for yes and two knocks on the right for no. Only then does she give you the map.

Top floor. Look through the mannequin's binoculars to spot another symbol. Now you have all the symbols to solve Andrew Verney's lighthouse miniature puzzle, but you only need the first four Roman numerals.
Original Edition. Some symbols are different, but not those that matter. The ones below are from the Director's Cut edition.

Zoom in on the lighthouse miniature and press the buttons in the right order:

Get the missing radio knob and the instructions from the safe.

Go back to the WWII exhibit. Look behind the chairs left of the door. Use the lantern and find the goggles on the floor. From now on, whenever they beep click on them to see ghostly presences.
Use the missing knob on the radio and position the knobs according to the instructions. You'll obtain a set of coordinates, which you know are Y-axis coordinates since the third knob reads "y."

You also know these are Y-axis coordinates because the helix on the plane in the first photograph on the picture board to your right lights up in a Y-shape.
There are several more places here in 2004 where you can use the goggles:
WWII exhibit, Original Edition. Click the rightmost picture of the plane on the board to the right to go to the crew rec room in the year 2090 A.D. I strongly recommend against doing this, as it disrupts the timeline of the narrative! Thankfully it's been removed in the Director's Cut edition.

Cave. In the pool by the entrance. Look down and see a green symbol.
Second floor. Click the picture of the door to go to the hut in 1912.
First floor. Click the picture of the kitchen to go the kitchen in 1912.
Ground floor. Click the picture of the boiler room to go to the old boiler room in 1912.
Use any of the methods above and go back to 1912.
FETCH ROCK LIGHTHOUSE, 1912
Here, too, are several places where you can use the goggles:
Boiler room. Click on the wall behind the boiler to go to the buried boiler room in 2090 A.D.
First floor. Click on the 1912 registry to see a set of X-axis coordinates (you know it's X because you can see an X on the large map on the wall).


Second floor. Open the FRL box in the crew room and click on the picture of the bottle to go the same place in 2004.
Top floor. Look at the lamp with the goggles to see a yellow symbol.
Third floor. Open the secret safe in Drake's room's closet (code: P3784 or R3782) and click on the picture of the reeds to go to 2090 B.C.
Do the latter and go far into the past, to 2090 B.C.
FETCH ROCK MARSH, 2090 B.C.
Go right and straight three times. Look in the first basket with the eggs and turn on the goggles to see a blue symbol:

Go forward from the village and explore the usual underwater cave. In the cave farthest from the entrance you find Malakai, a temporal probe from the future. Here is where you'll need to enter the colored symbols, the X-Y-Z coordinates, and a date and time at the end of the game, so keep this location in mind!
On your way back from the cave, look up at the three rocks piled up on top of one another and find another floppy disk on top of them.

Go back to the village. Walk between the two tents and go left. Ford the river on the right until you come to an island. Use the goggles on the ground and a "Z" sign appears. Use the goggles on all three posts to get the Z-axis coordinates:

Return to the reeds, use the goggles, and click on the reeds to return to 1912.
FETCH ROCK LIGHTHOUSE, 1912
Go to 2004. The fastest way from where you are is to go down to the crew room on the second floor, open the FRL box, and click on the picture with the bottle.
FETCH ROCK LIGHTHOUSE, 2004
Go to the WWII exhibit and insert the new floppy disk you found in 2090 B.C. Note the robot color sequence, even if you have no idea what it's for right now:

You must travel to the future to know what this is all about. Go to the old boiler room and use the goggles and click on the boiler room picture to go to 1912...
FETCH ROCK LIGHTHOUSE, 1912
...and then click on the wall behind the boiler (still while using your goggles) to go to 2090 A.D.
FETCH ROCK DIG, 2090 A.D.
Go through the hole under the stairs until you come to a red wall. Turn around and go down the ladder into the elevator shaft. Pick up the laser screwdriverfrom the green toolbox.
Go down into the elevator and out into the corridor. Move forward to the second corridor. At the end, look right and down to find the ventilation shaft. Use the screwdriver on it and crawl in. Go left and to the storage room. Nothing you can do here now except observe. Notice the tool dispenser opposite the vent shaft.
Leave the storage room. Go straight and into the medical bay. Pull the bed curtains apart, use the goggles, and see a date:

Leave the medical bay and go left, to the crew rooms.
Taku. Pick up the adhesive strips from her bed. Read her pad to learn the storage room tool dispenser's code for the Xi-Light lamp: 391865. There's also some scanning equipment here, but you can't use it now.
Krost. Pick up the robot remote control from under the comic books on the bed.
Dehiva. Nothing to do.
Hart. Pick up the computer room key from behind the sailboat left of the entrance. Also see the drawing by the pillow with what looks like a code, but you can't use it anywhere and I don't know what it's for.
Go back to the storage room and enter the Xi-Light lamp code in the replicator: 391865. Pick up the Xi-Light lamp.
Go to the rec room. Use the Xi-Light lamp on the counter opposite the door. Pick up the sake cup and use the adhesive strips on it. Obtain a fingerprint.
Go back to Taku's room and use the fingerprint on the scanner on her desk. Browse the fingerprints until you find a match. Watch what happens...
Go to Krost's room and use the robot remote control on the robot on his desk. Press the colors in the sequence you know from reading the second floppy disk in 2004: pink, green, red, blue, orange.
Now you have the four Malakai symbols from four different time periods; the three sets of coordinates, those too from three different time periods; and the date that Malakai must travel to. However, you're still missing the exact time. Go to the computer room at the other end of the hallway from the rec room. Use the key on the access panel on the left. Go in and look at the table on your right. Use the goggles to see a time:

Now you have all the information you need. Make your way back to the old boiler room to return to 1912...
FETCH ROCK LIGHTHOUSE, 1912
...and then climb all the way to the third floor, enter Drake's room, get in his closet, open the safe, and click on the picture of the reeds to get to 2090 B.C.
FETCH ROCK MARSH, 2090 B.C.
Go to the cave and find Malakai again. Enter the date and time, the coordinates, and the symbols. When you're done, Malakai's control panel must look as follows:

Click on the fast forward sign to send Malakai back to its time. Enjoy the ending.


Comments