

Guide: "Dark Fall: The Journal" (2002)
- Feb 1, 2017
- 7 min read
Updated: Aug 2, 2018

OUTSIDE
Go forward and exit the tunnel. Climb on the right-hand platform. Go forward. Enter the shed on the right and flip both switches. Explore the ladies' bathroom if you wish. Go back to the platform.
Enter the station on the right. Get two coins from the dispenser at right. From the waiting room at left, read your brother Peter's papers and electronic pad to learn about the Station Hotel, Dowerton, and Nigel and Polly. Note that he said his theodolite device freaked out at coordinates 271, 634. He also notes that he thinks a good name for the club would be "Kars." At the ticket counter, pick up a lanternfrom the table on the right.
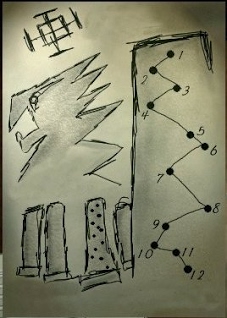
Go back out. Cross the wooden footbridge to the other side of the platform. Examine the theodolite. Enter coordinates 271 and 634 to find a symbol.

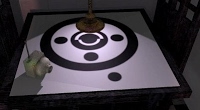
Take a left into the bushes and go to the barn. Use the lantern to proceed. Go upstairs and get the screwdriver. Behind the car is a trapdoor. Explore the cave below. Click on the lantern again to set it down on a stone. Click on each dot on the right to see a symbol through it. Note down this sequence of symbols, from top to bottom! Return to the platform.

Cross to the other side of the tracks and enter the hotel through the buffet room (the door past the waiting room). In the buffet room, pick up the device from the shelves on the left and keep it active in the background.
From now on, refer to the maps below. You can get almost everywhere for the entire game, with the exception of the final few rooms.
GROUND FLOOR
Reception desk. Pull a sheet of paper over the scribbles and click on the pen to write on it. Move the sheet of paper until the numbers overlap with the dots and you hear Edith's voice scolding Betty. Read the letters behind the desk.

Office. Retrieve the safe code from the drawer. Open the safe: left, up, center, down, right. Get the bar key from the safe.

Bar. Look around and learn about the place. Once you have the musical score (room 3D) and the instructions on how to play the piano (room 2D), you can play the notes: G-G-A-B-C. Learn a new symbol. (Match it with a word, according to the sheet in room 3A).

Bathrooms. Nothing to do now, but see some ghostly apparitions.
Kitchen. Pick up two half-burnt pieces of paper from the stove's bottom tray: they give you hints as to the table numbers in the dining room.
Dining room. Based on the pieces of paper from the stove, you can figure out the numbers of some of the tables. Another hint is in Dr. Verney's room (2E).


Tables 1-5
FLOOR PLANS
You can go anywhere and there is no particular order in which to do things, but I found it useful to do these two things first:
Get the goggles in room 2D.
Get the sheet that matches words with symbols in room 3A.
Switch on the water in the attic.
Do your own exploring and refer to these floor plans to get oriented.
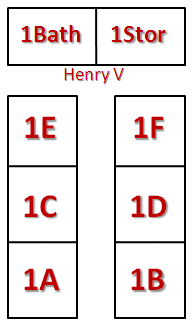
FIRST FLOOR
1A. Look out the window and hear someone whistle down on the tracks. If you have the goggles (room 2D), see the colored symbols on the floor to your right:

1B. See the writing on the wall.
1C. Nothing to do.
1D. Thomas Callum's room. Read the letters to learn how he related to Betty.
1E. Gloria Grable's room. When you have the goggles (room 2D) you can remove a board from the floor on the right to find a new symbol. (Match it with a word according to the sheet in room 3A).

1F. See the thermometer in drawer: it reads 15 degrees Celsius.
1STOR. Nothing.
1BATH: Once you've turned on the water in the attic, let the water flow in the sink and learn another word and symbol in the mirror:

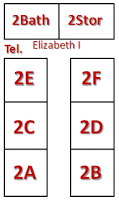
SECOND FLOOR
Go up to the second floor and hear some terrifying sounds.
2A. Notice the scissors in the wall. Nothing to do here.
2B. Matilda Fly's room. See the clock with four buttons. Press them so that they all make the same sound. The order is 3-1-2-4. New symbol. (Match it with a word according to the sheet in room 3A).

2C. Open the closet and find a strange box. Look at the scribbles from the reception desk's notepad to know in which order to press the buttons.

Recover the new word and symbol:

2D. Nigel and Polly's room. Locked. Key is in the third-floor storage room. Pick up the goggles from behind the boxes. Read the notes, see the pictures on the board at left. Learn a new word and symbol. Also note room occupants, camera locations, and a hint that the computer password is Nigel's favorite meal from the Chinese take-out.


Read as much as you can from the computer on the left. To know the password for the computer on the right, find the Chinese restaurant's number from the flyer on the other board, call them, hear that Nigel's usual order was #15, find #15 on the menu that's pinned on the board, and that's the password: "chicky chow." Access the right-hand computer, select the last camera on the right, and enter the coordinates (find them in the third-floor bathroom): 00:20, 00:90, 00:05, 00:40.

2E. Andrew Verney's room. See the star charts in the closet, the hint book in the drawer, and the locked box on the bedside table. Go out and to the end of the hallway and look into the telescope. Find a diamond-shaped constellation that makes Verney say "Brighter than the rest!" Go back to the room and find that constellation in the charts: its name is Raka. Find the line with "Raka" in the hint book and note down the code: 12-534-76. Press the buttons on the locked box in that order and find a new symbol.


2F. Take the camera and look at the pictures. Nothing to do.
2STOR. Just a broken slot machine.
2BATH. Recover the upper half of the table map from the vanity box under the sink on the left. You'll find the lower half in room 3B.
Notice the painting of Elizabeth I at the end of the hallway. Go to the third floor.
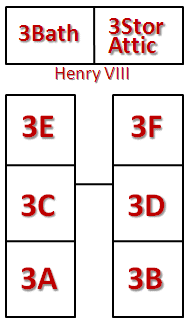
THIRD FLOOR
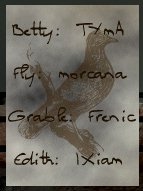
3A. Arther's studio. See the drawing that labels dining room table 4. Grab the sheet with a bird from the table. See the stove. Also read the note on invisible ink from the cabinet below the stove. Turn on the gas handle on the wall and then press the leftmost button on the stove to turn it on. Use the bird sheet on the stove to read a message. This tells you the codenames for some of the people at the hotel: the symbol in Gloria Grable's room (1E) is for the word Frenic, the symbol in Matilda Fly's room (2B) is for the word Morcana, and the symbol in the piano in the bar is for the word Tyma (since Betty is the musician).
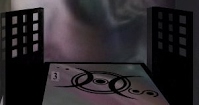
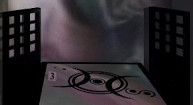
3B. George Crabtree's room. See the locked box with the monarchs. You already know Henry V, and you should recognize the pictures of Elizabeth I and Henry VIII (if you don't, their names are hinted to in Nigel and Polly's room). So enter VIII, V, and I and retrieve the bottom half of the table map (see above). Now you know how to arrange the symbols on the table, so do it. Learn the word and symbol for OLKAS.


3C. Nothing to do.
3D. Betty Penfold's room. Activate the metronome to reveal a letter on the desk. Find a musical score in the trumpet by turning it all the way to the left. These are the notes you must play on the piano in the bar on the ground floor.

3E. Edith Penfold's room. Read Edith's journal to know that her favorite song is "On Hastings Pier." See the record cover in closet: "On Hastings Pier" is track 2. Turn the crank to charge the gramophone, switch it on, and place the arm at position 2. Look around and on your left and a picture will fall off the wall. Behind it are a new word and symbol.

3F. George Crabtree's study. It's locked, so slide the sheet under the door and use the screwdriver on the keyhole to recover the key. Read George's journal to learn about Dark Fall. On the far corner, watch slide #4 and note the sequence of elements: fire, lightning, air, and water. See the photos on the desk. Open the slides holder, switch on the projector, and put in slide #5. Zoom in to learn a new symbol. The word for it is in the slides index card on the desk, at #5.


"MORTYM"
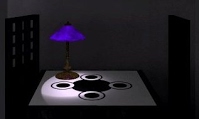
3BATH. Turn the mirror on the vanity right of the door until it reflects the purple lamp on the other side of the room. Then turn left and see the writing on the wall. Zoom in and note down the settings for Nigel and Polly's basement scanner.

3STOR. Retrieve the key to Nigel and Polly's room from the teapot on the left. Climb up to attic.
ATTIC. Switch on boiler, then turn the first wheel on the left and press the switch to give hot water to the first floor's bathroom. Open the suitcase with the screwdriver: the sequence is left, right, left, right, down. Find a new word and symbol inside.

BASEMENT

The door to the darkroom is locked. Now that you know the order of the dining room tables, press them in the right order on the control panel. The door to the dark room opens. Pick up the handle from the cabinet at left. See and develop some pictures from the table at right. Back to the basement. Go to the opposite end and push aside the planks that Nigel and Polly's instrument points to. Enter the tunnel.
Use the lantern to see. Use the handle on the hole. Once inside, ignore all the symbols and go forward.
The first test is green, blue, purple, and red, as per room 1A.
The second test is top, left, right, and bottom, as per the slide in 3F.
The third test is top, bottom, bottom-right, middle, bottom-left, as you learn from the sounds on the walls to the right and left.
Proceed to the final chamber.
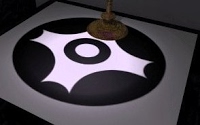
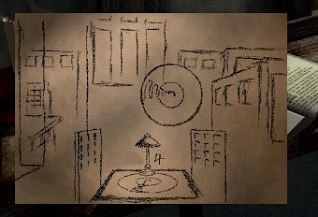
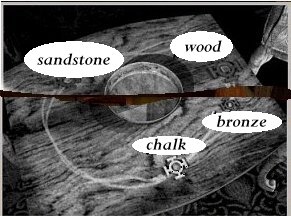
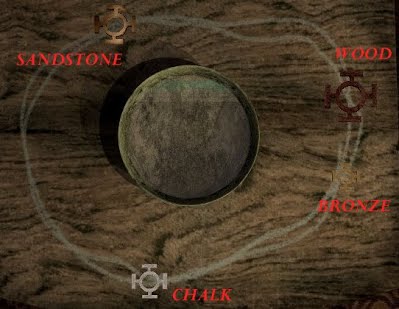
Enter all the words you've collected so far. The order is determined by the circles in the cave under the barn:
LUSSA, KARS, OLIVIAK, FRENIC, MORCANA, TYMA, MALUS, LARSUS, OLKAS, MORTYM, IXIAM, RAKA
Dark Fall is defeated and the spirits freed. Enjoy the final cutscene.


Comments