

Guide: "Return to Mysterious Island 2: Mina's Fate" (2009)
- Feb 4, 2017
- 22 min read
Updated: Aug 2, 2018

1. Healing Mina and Jep
Watch the cutscene. Ouch! You start off as Jep. Look right and see that Mina is trapped. Click on her lifejacket to inflate it, then on the seatbelt on her left to release it. Click on the right-hand window to escape the helicopter.
Talk to Mina: she needs a bandage for her leg. Go right and toward the windmill. On your way there, grab a tree leaf +1 from under the broken planks at left.
Meet Slugger in the grove. Get a grass blade +1 and a large broken branch +1. Try to get the pine nuts: Slugger will bully you into giving them up. +5
Climb the stairs to the windmill. Get a hook +1 and dirty rag +1 from the chest.
Head left toward the workshop with the kiln. Get the three dried twigs +1. Turn over the crucible under the planks to get worms +1 and the ocarina +1.
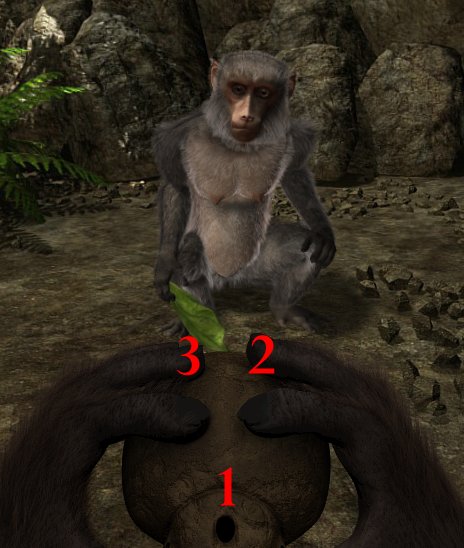
Enter the workshop. Wash the dirty rag in the basin to get a clean rag +1. Talk to Amber the monkey. Groom her and then beg. She gives you the stone. To crack the seeds you have to click thrice: first to raise the stone, second to stop it when it’s right above Jep’s head, and third to strike the fruit when the circle turns green. Get five seeds +1.
From the kiln, go past the ruins to the intersection and collect a snake slough +1 and two oranges +1.
Go past the cornfield and left toward the swamp. Get three eggs +1, three blobs of clay +1, and a stick +1. You can’t get those fruits in the swamp yet.
Return to Mina. Give her the clean rag and hug her to begin healing her. +15
Go right and toward the sulfur springs. Grab some tinder +1 from under the root.
Go to the ravine by the volcano. Nothing you can do now about the monkeys in distress. Try to grab the purple austral thyme, but a snake comes out! Equip the ocarina: left-click to play and then click on any of Jep’s fingers to serenade the snake. That’ll make it sit up. Quickly right-click twice to put the ocarina away, then click on the austral thyme +1 to collect five samples.
From the crossroads, go toward the sea and down the slope. Along the way, grab a short branch +1 from the ground. Ignore the poor sea turtle.
Short branch on Jep = pointed stick +1.
Tree leaves on Jep = dirty sponge +1.
You could go down to the beach, but it's useless now. To heal Jep:
Hug Mina (no points for you, but Jep's health goes up by 15)
Adorn Jep with austral thyme +5
Eat one egg +5
Eat one orange +5
Eat five seeds +5
Go back to Mina and talk to her. She hears a sound. Return to the sulfur springs to see one of Nemo’s robots hovering about! Weren't they gone at the end of the first game? Turn around and hear Mina cry for help! Run back, but she’s gone.
Total possible points so far: 60
2. Rescuing Mina
Back to the windmill. There’s Mina, besieged by a jaguar. You can enter the mill through the tree closest to it. Give Mina the austral thyme to medicate her. +1
Exit the windmill the way you came in. Pick up a grass blade +1 and the soiled bandage +1 from the stairs. Slugger is gone, so pick up the rifle +1. There's a carcass with carnivorous ants. Click on the carcass and equip the grass blade. Click on the ants’ heads to capture them; collect all ten ants +1.
You need seven ants to heal Mina, but you only get +1 if you get all ten.
Now to get rid of the jaguar. Go to the swamp to get Jep dirty, then go to the tree with the scarecrow and climb up.
Equip the stick and use it to get the bee hive +1. Do not put the bee hive in your inventory, or Jep will be hurt. Go to the windmill and the bees will chase the jaguar away. +1 When it’s gone, recover the stick and get the hornet larva. +1
Go to the workshop and wash the soiled bandage into the basin again to obtain another clean rag. Wash yourself, too! Enter the windmill and give Mina the ants to start the suture mini-game. Click on an ant, then on the wound, and then on the same ant again +10. Once you've stitched up Mina, give her the clean rag. She is now able to walk comfortably. +35
Alternatively, you could grab the bandage/rifle/ants first, then the bee hive, and chase away the jaguar before healing Mina... but that makes less sense, story-wise.
Total possible points so far: 112
3. The Robot
(Play as Mina). From now on, you can switch back and forth between Mina and Jep depending on the occasion.
The robot again! This time it crashes. Head for the sulfur spring and see the robot at the crossroads. Click on its control panel.
If you’ve played the previous game, you know that the Nautilus’ built year is 1860. This date is always a puzzle hint. Four digits are displayed above the robot's control panel, and to solve the puzzle you will enter four digits on the robot's keypad.
Let’s call the digits 1,8,6,0 the "Nautilus digits" and let's call the digits displayed on the robot's control panel the "robot digits." Take the first robot digit. Is it also a Nautilus digit, so either 1, 8, 6, or 0? If yes, then you need to enter the position of the Nautilus digit in the number 1860. All other robot digits correspond to a zero.
For example, robot digits 0458 correspond to 4002. The 0 has the fourth position in 1860 and thus turns into a 4; the 4 and the 5 don’t appear in 1860 and thus turn into zeroes; and the 8 holds the second position in 1860 and thus turns into a 2. Likewise, 4372 would be 0000 and 1860 would be 1234.
Unfortunately, you get no points for this puzzle! How unfair. Click again on the control panel. You need to unscrew it, so you must go looking for a screwdriver.
Go back to the lake. Jep will wait while Mina takes a dive. Swim back to the helicopter. Grab two fresh water mussels +1 from the rock at left and the frayed steel cable +1 at right. Swim in from the window. Get the string spool +1, the envelope +1, and the Swiss knife +1 from the pilot. Also get three crawfish +1 crawling on the pilot’s back. From right of Mina’s seat pick up a handle +1. The winch controls don’t work, so swim back up.
Frayed steel cable on the inventory's assembly area = two steel wires. +1
Envelope on assembly area = documents.
Swiss knife + string spool (four times) = five cords. +1
Back to the robot. Use the Swiss knife on each screw to open the panel. Click on the fused circuits to take them out. You’ll need new ones. Where did you kill a robot in the first game? On the beach, so let’s go there.
On the shore, pick up a jerry can of gasoline +1, a sextant +1, a pipe +1, some wheat mixed with sand +1, a broken stoneware bottle +1, and seaweed +1. Click on the robot’s panel, unscrew it like you did before, and get its circuits. +1
Broken stoneware bottle + Swiss knife = cork. +1
Go back up the slope. The jaguar is back! You can use the wall-mounted defense lasers to chase it off. Go down a step toward the beach and click on the laser’s panel up on the left. Unscrew the panel, open it, take out the bad circuits, and use your circuits on it. Study the pattern of the green lights: you need to place a circuit whose green lights match those on the board, as in this picture:

Close the panel and flip any one switch to arm the lasers. Exit and see the jaguar run. Click on the control panel again, recover the circuits, and return inland.
Go to the robot and use the circuits on its control panel. This is a harder version of the previous puzzle. Start with the circuits that have four sets on green lights on the board, then move to those that have three, etc. Some circuits will burn out, but that's okay. Whenever you place a circuit correctly, you will hear a beep or a mechanical sound. Or you can just copy this solution: +10

The robot says the geothermal motor is breaking down and the island will blow up! It gives you a map of the island and then tries to give you a map of the route to the geothermal motor, but the latter is an illegible map +1. All you know so far is that the passage to this route is at an altitude of 340 feet...
Total possible points so far: 140
4. New Side of the Island
Go back through and past the cornfield. The volcanic bomb has opened a route to a new side of the island. You need to get past the swamp somehow.
(Play as Jep). Go down on the ledge. Look up, equip the stick, shake the purple fruit down from their branch, and pick up the soiled fruit +1. Use the stick to probe the mud and find a place without quicksand so Jep can cross over. The first safe place is right ahead of you, slightly on the left. From there, about 90 degrees left, and from there, about 90 degrees right. Or see the pictures below:

Jep must restore his energy bar to green before he can lower the tree trunk to help Mina across. DON’T EAT ANY OF THE FOOD YOU FIND JUST YET.
At the crossroads, pick up the charcoal +1.
Go left toward the volcano. Grab the Tahitian gardenia +1 and the oil palm fruits +1.
Return to the crossroads and go straight, to the furnace. Not much to do here as Jep, but get up the kiln and use the pointed stick to get the dying bird +1 on the kiln and another bird +1 on the nest above.
Return to the crossroads and go right, down the slope. A critter tries to run away: stake it with the pointed stick and get a lemurid +1. Look up on the tree and take three honeycombs +1. Take some water spinach +1 from the pond.
Go back across the swamp and to the workshop. Wash up and return to Mina.
To heal Jep:
Hug Mina (+10 energy for Jep, but no bonus points for you).
Get on Mina's shoulder.
Austral thyme + Tahitian gardenia = bouquet. +1
Adorn Jep with the bouquet. +12
Adorn Jep with the Tahitian gardenia. +5
Eat a bunch of oil palm fruits. +6
Eat the lemurid. +5
Go back across the swamp and lower the trunk so Mina can pass.
Total possible points so far: 178
5. Finding 340 Feet
(Play as Mina). Go right, to the furnace with the blacksmith tools. Take the hardy +1 at left. Also observe that the base of the signpost reads "325 feet."
Back to the crossroads, down the slope at right, and to the sawmill. Get the nail +1 and saw blade +1. Also note the still, though you can’t use it yet.
Save your game. Move the stone near the sawmill. A monkey tries to steal your items! Salvage as many as you can, but if he steals any you’ll be able to recover them later (or reload and retry).
From the chest under the stone, get a stack of papers from the castaways full of clues for future puzzles. Also red pigment +1, some chalk +1, a grindstone +1, a weight +1, and an ax +1.
Put the grindstone on the sawmill and replace the nail. Push the pedal on the ground to spin the grindstone. Use the saw blade, the hardy, and the ax on the grindstone to sharpen them. Get the sharpened saw blade +1, the sharpened hardy +1, and the sharpened ax. +1
Go to the grove at the foot of the mountain. Use the ax on the trees to get a pile of poles. Take three 21-foot long poles +1.
Return to the sawmill. Replace the grindstone with the sharpened saw blade. Place one pole on the bench, push the pedal to start the blade, and pull the lever at right to saw the pole in two. Collect the two shorter poles. Now do the same with another pole, but this time move it by one position to the right before you saw it; drag and drop with your mouse to do so. Then do the same with the third pole, this time moving it two positions to the right. In all, you will have:
18-foot long pole +1
15-foot long pole +1
12-foot long pole +1
6-foot long pole +1
9-foot long pole +1
3-foot long pole +1
Recover the nail and saw blade before you leave.
Read the castaways' papers that you got in the chest to learn that you can build a level to estimate altitudes:
Sextant + weight + cord = level +1
Go to the furnace. Put the 15-foot pole on the stone that reads 325, so that the top of the pole is now at 340 feet. Go up to the crossroads and look toward the furnace. Equip the level and set its sight to just above the 15-foot pole you've just placed. Keeping the sight stable vertically, pan around horizontally and look for a landmark: a good one is a grey bird on top of a tree. Now return to the sawmill, equip the level again, and look for the grey bird, which you know is at 340 feet. From there, pan right toward the cliff. Mina sees some bushes move. There’s the passage at 340 feet!

Total possible points so far: 197
6. Healing Mina
Before exploring the new passage, you need restore Mina's energy. There is also a lot of new stuff you can do now that you would need later anyway.
First, light three fires: one at the furnace, one at the sawmill under the still, and one at the kiln by the workshop.
Disassemble the level.
Sextant + twigs + large broken branch = fire. +1
Sextant + tinder + any pole = fire.
Sextant + illegible map + any pole = fire.
At the furnace, put the nail in the fire. Pick it up with the tongs on the wall, place it on the rock, and beat it once with the hammer from the wall. Right-click to exit and put the nail in the basin on the ground to obtain a twisted nail. +1
Do the same with the rifle. Hit it once to obtain a rifle barrel. +1
Do the same again with the rifle, this time to obtain a flattened barrel. +1
Place the sharpened hardy on the rock. Repeat the process twice more to obtain first the flattened tube +1 and then the final product: steel tube. +1
(Jep). Grab another 21-foot pole from the grove. Go to the swamp. Use the pole on the blue desserts and pick up the soiled fruit. Go wash them and yourself in the basin and collect more blue dessert +1. Also wash the dirty sponge to get the sponge +1. Go back to Mina.
(Mina). Go to the workshop to make pottery. Equip clay and click on the potter's wheel. Click on the clay to put it on the wheel, then on the basin to wet your hands. Click on the wheel to spin it. You can mold the clay six ways: top only, middle only, bottom only, top and bottom, middle and bottom, middle and top.

Make two of each possible shape and collect a total of twelve pieces of pottery to be fired +6. At the kiln, pull the strings on the bellows to revamp the fire, then place each vase on the kiln to fire it. You now have twelve vases +6.
Collect three vases full of water from the basin in the workshop +3.
IMPORTANT. Each time you pour a liquid or powder into a vase of a new shape, the game gives you a point. You have 6 shapes now, plus 6 more later, and a total of 9 liquids/powders (water, sand, flour, alcohol, perfume, quicklime, lime, blue paint, and magenta gas). That's 108 free points. This walkthrough DOES NOT use this trick: it's tedious work and feels like cheating, so my point total only reflects when you must put a liquid in different vases, like with water.
Empty the three vases of water and fill three different ones +3.
Go to the windmill.
Wheat mixed with sand + water = wheat +1 and sand +2.
Do that for both of the bags you have.
Wheat on mill = flour +3 (do this three times with three vases).
Oil palm kernels on mill = palm oil +1.
Go to the maple tree by the lake and grab two vases full of maple syrup +2.
Go to the sawmill. Use a vase of water on the still's cooling tank to fill it. Use the pipe on the still to complete it. Now it's ready for use:
Maple syrup on the fire = sugar. +1
Maple syrup or sugar or honey or fruit on the still = alcohol. +1
Sponge + alcohol = sponge imbued with alcohol. +1
Red pigment + alcohol = red paint. +1
Tahitian gardenia or austral thyme on the still = perfume. +1
You can now build yourself a fishing pole:
Cork + red paint = red cork. +1
Red cork + cord + hook + stick = fishing rod. +1
Fishing rod + worms = fishing rod with lures. +1
Disassemble the fishing rod entirely.
Red cork + steel wire + twisted nail + stick = solid fishing rod. +1
Fishing rod + worms = solid fishing rod with lures. +1
Go to the lake by the maple tree and start the fishing mini-game. Click on the lake to throw. As soon as the floater moves, click again to start pulling. Keep your left click pressed until the fish on the right turns red, then immediately let go. Press the left click again as soon as it turns green again, and so on, until the fish is in your net. It will take a while. You have unlimited tries.
Each fish you capture is worth a point. I don't think there's a limit to how many fish you can catch. For the sake of equity and sanity, I will count only one fish +1, plus the related points later for cooking or eating it.
Go to the kiln by the workshop to make food.
Water spinach + palm oil = seasoned salad. +1
Swiss knife + mussels = open mussels. +1
Mussels on the fire = cooked mussels. +1
Three crawfish on the fire = three cooked crawfish. +1
Fish on the fire = cooked fish. +1
Water + flour + palm oil + cooked fish = fish pie batter. +1
Water + flour + egg + honey or sugar or maple = cake batter. +1
Water + flour + egg + honey or sugar or maple = second cake batter.
Cake batter + blue dessert or orange = tart batter. +1
Fish pie batter on the fire = fish pie. +1
Cake batter on the fire = cake. +1
Tart batter on the fire = tart. +1
You could cook one egg directly instead of using it to make the cake, but when eaten it only gives you +5, as opposed to +24 for the cake. If you had three eggs you could do both, but I have not found a way to get to this point in the game with three eggs: Jep must eat one earlier.
To restore Mina's health, you can do a variety of things:
Adorn Mina with Tahitian gardenia. +5
Adorn Mina with austral thyme. +5
Adorn Mina with bouquet. +12
Adorn Mina with perfume. +6
Eat a cooked fish. +4 to +6 depending on size of catch
Eat a cooked crawfish. +3
Eat an orange. +5
Eat a berry. +5
Eat a blue dessert. +6
Eat hornet larvae. +5
Eat sugar. +5
Eat honey. +5
Eat seasoned salad. +13
Eat tart. +31
Eat fish pie. +28
Eat cake. +24
Eat oil palm fruits. +5
Eat seaweed. +5
Eat seeds. +1 each
Drink alcohol. Mina gets drunk and sings pirate songs. LOL
These are both energy points for Mina and bonus points for you. Mina only needs 34 points to restore her energy bar to full, but she will keep eating well past that. Follow this exact order:
Mina: eat seasoned salad: +13
Mina: eat fish pie. +28
Mina: eat tart. +31
Mina: adorn with Tahitian gardenia. +5
Mina: adorn with austral thyme. +5
Mina: adorn with bouquet. +12
Mina: adorn with perfume. +6
Jep: eat cake. +24
Jep: adorn with perfume. +6
Total possible points so far: 384
7. The Inlet
Once Mina is back at full health, go to the woods at the foot of the mountain by the sawmill and explore the new passage at 340 feet. You'll come out on a cliff overlooking the inlet on the other side of the island.
Look right. The naughty monkey is trying to steal your stuff again! This time he keeps trying until he manages to steal something, so wait until he goes for an item that you don't need right now (such as an empty vase) and let him steal it. You'll recover it soon enough anyway.
Go down to the beach. Behind you is a pool. Get some cliff reeds +1 from the pool and some wild peas +1 from the plant at right. Use the pointed stick on the termite nest on the right. Move the stick slowly so that it doesn't touch the walls. It will take a few tries, but eventually you will get some termites. +1
Reeds + knife = reed stalk +1 and paintbrush +1
Reed stalk + wild peas = blowgun. +1
Go left, walking along the wall. A monkey throws something at you from above! Pick up the empty coconut shell +1. See a basin with potting soil, but you can't use it yet. Dig in the sand on the left to reveal a shiny green device. It can be used as a mold, so use clay on it to get 6 unfired clay tokens +1.
Go to the shoreline. Pick up shellfish +1 and a can of dried out green paint +1.
Can of dried out paint + jerry can of gasoline = can of green paint. +1
Shellfish + knife = pierced seashells. +1
Pierced seashells + cord = seashell necklace. +1
Pierced seashells on Mina = +14
Pierced seashells on Jep = +14
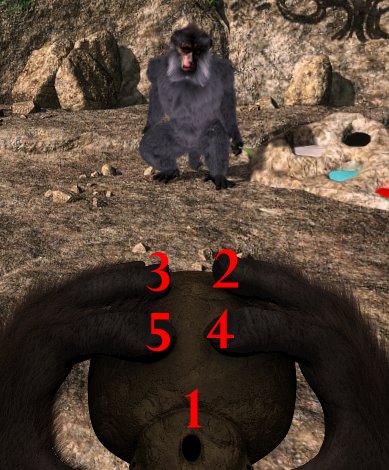
(Jep). Climb up the palm on the left and jump to the nearest ledge in the cliff. Climb up to the right eye of the face-shaped sculpture and move the plants aside to reveal another shiny green device. Use clay on it to get 9 unfired clay tokens +1. Go back down to Mina.
(Mina). Go right along the shoreline and see a device half-buried in the sand. Here's where you'll need to put the tokens once you've fired them, so keep this spot in mind. Return to the cliff, climb back up, and go back to the furnace.
(Jep). Climb up on top of the furnace and use the seashells on it. Return to Mina.
(Mina). Collect quicklime +1 from the furnace.
Go to the workshop and place both sets of tokens on the kiln to get 6 terracotta tokens and 9 terracotta tokens +2.
Seaweed on fire = soda ash. +1
Soda ash + quicklime + charcoal + sand = vitrifiable mixture. +1
Quicklime + water = hydrated lime. +1
Hydrated lime + chalk + palm oil = white paint. +1
(Hydrated lime on fire = quicklime again.)
As you read in the castaways' papers, to make hydrated lime you must add the quicklime to water and not the other way around, or it will explode.
Click on the crucible on the ground just outside the workshop to put it the kiln. Use the vitrifiable mixture on it, wait until it turns into a hot vitreous paste, and use the steel tube on the crucible to make a bottle. +1
Go back to the inlet and the beach, find the control panel, and place the tokens on it to reproduce the shape in the upper left-hand corner on each row. +10

Get the young green sprout +1. Place it in the basin with potting soil along the cliff. Use water on it; if you don't have any, get it from the pond at the bottom of the cliff, by the termite nest. The sprout will grow quickly into an arch-like structure. Get the turquoise liquid in a vase +1.
(Jep). From the top of the cliff, go right and meet the monkey, whose name is Leonard. He's a painter, so give him the red paint +8 and he will paint lava on the volcano on the wall. As soon as his back is turned, go left and jump to the palm. Quickly open the bag on your right and recover the objects that were stolen from you, if any. Jump back to the ledge before Leonard spots you. On the ledge, use the pointed stick to get the lizard +1 hiding in a wall crack.
Give Leonard the white paint +13, the green paint +8, and the turquoise liquid +20. Each time he will paint something new, and when he has turquoise he will paint a symbol:

Before you leave, Jep can also have fun with painting: dip the paintbrush into each color in turn (+5) and click on the wall on the right to paint Mina!
(Mina). Go back down to the beach. Dip the paintbrush in the turquoise liquid to get a turquoise paintbrush and use it to draw the symbol in the arch. +10
Total possible points so far: 510
8. The Monkeys
Inside is an ancient cave! If you go down the slope the monkeys attack. Slugger and Sentinel are very angry, but Leonard and Amber can be pacified, and there's a monkey missing. You can try to attack the monkeys with the blowgun, but you can't take four. So Jep must act as an "ambassador of good will" and befriend Leonard, Amber, and the missing monkey.
Befriending Amber
Amber is on the cliff that gives access to the inlet, near the passage at 340 feet. Before you climb up, disassemble the fishing rod: you will need the hook soon. Also, lay down a 21-foot pole across the bed of thorns. Get another 21-foot-pole from the pile.
(Jep). Walk the pole to the ledge. Use another pole to shake down the fruit from the plant in front of you. Pick up the Trulca berries +1.
Climb up to the higher ledge. Amber is here, but so is Slugger. Scare Slugger away with either the snake slough or the can of green paint: equip one, talk to Slugger, and choose "Intimidate." He will run away.
Use the hook on the bone on the ground to extract bone marrow +1. Look in the "mouth" of the sculpture on the wall and find a Tahitian gardenia and an enameled vase +1. These are hints to what Amber likes. Go back to Mina.
(Mina). Paint six vases with the turquoise paintbrush to get six enameled vases ready to be fired +6. Do one of each shape, even the one that you took from Amber, because you don't have the "ready to be fired" version yet. Then burn them all on the kiln by the workshop to settle the color and obtain six enameled vases +5. (To do this, you will have to transfer at least one liquid or powder to free up one vase of each shape: which will give you +1).
(Jep). Return to Amber and scare Slugger away again, but you will need to use a different object than last time.
Give Amber all six vases. +18
Give Amber the bouquet. +12
Give Amber the seashell necklace. +14
Give Amber the Tahitian gardenia. +5
Give Amber the austral thyme. +5
Give Amber the perfume. +6
Play two songs for Amber, as shown below. +10


Befriending Mama
From the cornfield, follow the telegraph pole to the ravine.
Three cords = laid rope. +1
(Jep). Cross over and go right. Throw the rope to the baby monkey to rescue him. Collect the baby monkey +1 and carry him to his mother, who is now a friend! +50
Befriending Leonard
(Jep). Using your pointed stick, collect two dying birds by the hollow between the furnace and the sawmill. +2
Return to Leonard. Give him three birds and the lizard. +20
Equip the ocarina and play a note. He will whistle a song that you must reproduce on the ocarina. Do this for two songs, as shown below. +10


Total possible points so far: 679
9. The Geothermal Motor
Now that Leonard, Amber, and Mama are friends, go back to the cave. Slugger and Sentinel are still hostile, but you can take two monkeys easily. Shoot the blowgun at both and avoid friendly fire. Slugger and Sentinel will run away. +10
Go down the stairs. Place the vases on the alcoves. The lines under each alcove mimic the shape of the vase that must be placed on that alcove: +10

Solve the musical puzzle as shown below.

Go through the gate. See the island from the eyes of the face-like sculpture. At left are the archives and language machine. Get the metallic ovoid +1 from the archive, then put it back as the alarm sounds. Pick up the organic ovoid +1 to its right. The island is filling with green gas!
Organic ovoid on Jep = adulterated ovoid. +1
Put the adulterated ovoid where you'd picked it up and the gate opens +10. You could pass, but you need to understand the strange language first, as you'll need it later. So you must solve the language machine puzzle.
Language machine. Each blue cap contains part of a sentence and each pipe speaks the sentence at different speeds and pitches. The goal is to match each cap with the appropriate pipe so that the resulting sentence makes sense. This picture shows where the caps must be positioned, but all the caps look alike, so you're going to have to try each and see if it matches. A good strategy is to start from the right and try each cap on the right-most column. When you know which cap belongs there, leave it in place and move to the left; that way you won't have to hear the same words over and over again as you progress. +10
Alternatively, just follow the picture below, made by Tom Hayes!

Now you understand the alien language. Click on the various ovoids on the wall to hear the stories of all who have come in contact with the entity that Nemo has called "X." When you're done, go through the gate.
Here's the geothermal motor! Go left, but you can't enter Nemo's base yet. Pick up the twisted crystal holder +1 from the pool of water at right, taking care not to touch the exposed power cable.
Walk past the steam turbines and access the control panel on the left. "X" will ask you to verify that you understand its language by speaking five numbers between one and four. Press the corresponding button each time (one, two, three, or four dots) to access the panel.
There are two problems with the geothermal motor: (1) the water intake pipe is blocked; (2) the gas is flowing back into the turbine from the exhaust. So we must free up the water's path and prevent the gas from entering the turbine.
Move the left-hand lever to the top and close the panel. The water intake valve will close and the gallery to your right will empty.
Open the door to the gallery. Get some water from the floor +1. Use the sponge imbued with alcohol on the floor to get a clean sponge. Go downstairs. Look up and see the crystal on the wall. Use the ax on it to obtain a crystal +1.
Water gives you a point because you only have enameled vases left, and you shouldn't have been able to put water in an enameled vase before.
(Jep). Crawl through the hole and into the turbine. Use the empty coconut shell on the hole at the other end. This fixes problem (2) above. Go back to Mina.
(Mina). Backtrack all the way out to the furnace. Put the twisted crystal holder in the fire, pull it out with the tongs, place it on the flat rock, hit it once with the hammer, put it in the water, and collect the crystal holder +1.
Crystal holder + crystal = insulator. +1
Go back to Nemo's base. Pick up the exposed power cable with the insulator and place it on the wall. Now the power is restored, so open the door and go in. +10
Go left. Use the sponge on the oil stain on the shield control console to get a sponge imbued with oil +1.
Go to the other side to Nemo's lab. Pick up Nemo's adulterated ovoid +1 at right and the empty sampler +1 from the mixer. Use the sampler on the small plant on the left to get a cellular sample +1. Push the red button on the counter to reset the mixer and then put the sampler back in its place. Look through the eyepiece to see the plant is sick. Collect a sample of the other plant, the healthy-looking one, to see that it has the same cellular structure, so it's reasonable to conclude that all plant life on the island is getting sick. Nothing you can do now. Get the empty sampler again and leave.
Go to Nemo's office. Look at the portraits and read the notes on the desk and in his jacket. Pick up the mask +1. Use the sponge imbued with oil on the hatch.
Mask + hydrated lime = diving mask. +1
Open the hatch, go down, and turn the red handle to flood the airlock. Click on the mask and then on Mina's picture in the inventory to make her wear it. You're in the lake. Go forward to the helicopter, then left to the area that was too deep to swim to without the mask earlier. Get the metal hook +1 from under the wheel. Notice the large rock blocking the grate.
Now you can open the helicopter's cargo hold. Use the metal hook on the winch hook and then the winch hook on the cargo's door. Use the winch handle that you already have on the winch. Click on the winch. The door opens. Swim inside and get the net +1, the nitrogen tank +1, and the uninflated float +1.
Return to the large rock and use the net on it, then the float on the net, and the nitrogen tank on the float. Finally, click on the tank to activate it. The rock will rise, freeing the grate and thus the water intake. This fixes problem (1) above.
A jaguar is guarding the lake, so you must re-enter through the base... but you're locked out. The key to the combination is in the frames on Nemo's wall. Jep has thrashed the room, so one frame is visible through the hatch window. Click on the glass and then on each of the other two frames to make Jep turn them over. The frame with the combination is the one with the picture of Nemo's family. Enter the sequence of symbols in the lock, starting from the upper left-hand corner of the frame: +10

Climb back up into Nemo's cabin and tidy up the mess that Jep made. On the floor by the music box is Nemo's to-do list that contains hints for future tasks.
Go to the motor and open the control panel. Max out the left-hand lever and then push the right-hand lever up slowly. The energy bar must be in the green and all four green lights must be on. There are several ways to do it. Below is one: +10

Now that the motor is running, the island is stabilized and you can go outside and wait the rescue team. Get Jep and leave through the sanctuary... but that naughty monkey Slugger bursts in and breaks everything!
Total possible points so far: 767
10. Saving Mysterious Island
There's a new organic ovoid on the web behind the language machine. Grab it and use it on the blood that Slugger left on the floor to get an adulterated ovoid +1, then put it back on the web. This opens the gate again. Also replace the metallic ovoid on the web with Nemo's adulterated ovoid to read his memories. Before you go, use the glass bottle on the gas behind you to get some magenta gas +1.
Slugger is trapped inside the turbine. Follow him there.
(Jep). Slugger throws some spherical capacitors +1 at Jep. Catch five and he falls down. Click on him to drag him out and into the motor room.
Mina re-activates the motor. Oh no! Jep is ill too! You must hurry.
Go to Nemo's base. Slugger was here too and broke some stuff. From Nemo's lab on the right pick up the shards of violet glass +1 and the broken fuse +1.
Broken fuse + steel wire = fuse. +1
Replace the fuse and put the five capacitors in place next to it. You need to repair the violet glass bottle, so head out to the island.
Go back to the kiln by the workshop. On your way there, grab the empty coconut shell and the mixer's eyepiece +1 at the crossroads by the geyser. At the kiln, put the shards of purple glass in the crucible and wait until they melt into a hot purple vitreous paste. Use the steel tube to blow a violet bottle +1.
Return to Nemo's habitat. Go to Jep and use the empty sampler on him to get a blood sample. Go to Nemo's lab. Replace the eyepiece on the mixer, place the magenta gas bottle in the empty slot on the mixer, and put the violet bottle in the movable slot under the mixer. Insert the sampler with Jep's blood in the mixer and turn the magenta gas valve. Look through the eyepiece, turn that valve too, and watch what happens. +10
Now the game presents you with two choices:
Raise the shield. To do so, push the shield lever down very slowly.
Go meet the rescuers. Get Jep and leave through the temple.
Each choice corresponds to a different ending and cutscene. Neither gives you any points, so it's up to you and your conscience.
Congratulations!
You beat "Return to Mysterious Island 2: Mina's Fate."
Total possible points: 785
If you used the vases trick: 893


Comments