

The Jack Hall Gang Treasure
START
This quest begins by buying or stealing the map from Mexican treasure hunter Máximo Cristóbal Valdespino, during the Strangers mission All That Glitters, which first becomes available during Chapter II and remains available throughout the game.
JACK HALL GANG MAP #1
the clue on the map

the clue in the world

the clue's exact location

NOTES. Southwest of Valentine. Ride up to the plateau, and before reaching the camp, walk down to the slope at right. Go left and jump across the chasm. Shimmy along the wall until you find a searchable area. Recover a pearl necklace and the second map.
JACK HALL GANG MAP #2
the clue on the map
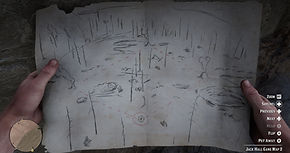
the clue in the world
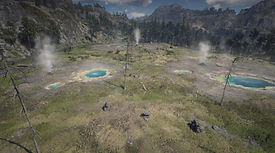
the clue's exact location
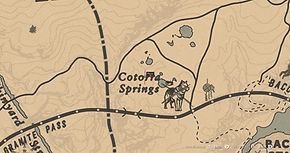
NOTES. Just north of the train tracks, go past the multicolored springs pools. There's a series of stone formations on the far left of this plateau. The one you want is the one that looks like a hat, with the flat top, near the geysers. Recover $15 and the third map.
JACK HALL GANG MAP #3
the clue on the map
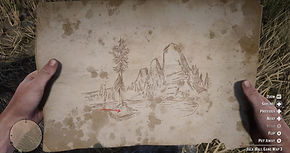
the clue in the world
the clue's exact location
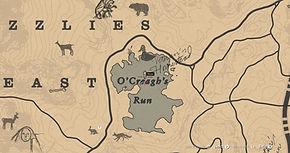
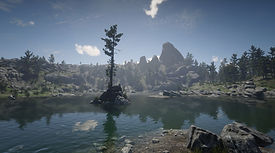
NOTES. This is where Arthur and Hosea first hunt the grizzly bear. Ride to the small island in the middle of the lake with the lone tree. The searchable area is on the flat lower rock that's covered in moss. The final treasure is two gold bars ($1,000).
The High Stakes Treasure
START
This quest begins by buying or stealing the map from a treasure hunter in a random event, which may spawn in various locations around Riggs Station, Wallace Station, and Diablo Ridge. For more details, see this wiki link or this video by user Platinum Chasers on YouTube.
HIGH STAKES MAP #1
the clue on the map
the clue in the world

the clue's exact location
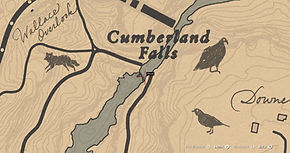
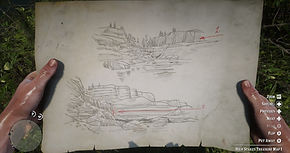
NOTES. Cumberland Falls, just west of Valentine along the Dakota River. Walk across the horizontal log and go behind the waterfall. The searchable area is directly on the floor. Recover a piece of jewelry and the second map.
HIGH STAKES MAP #2
the clue on the map
the clue in the world

the clue's exact location

NOTES. Barrow Lagoon, the frozen lake south of "M" in "Ambarino." Walk to the island connected by a frozen log to the northern shore. The searchable area is in the middle of that log. Recover a piece of jewelry and the third map.
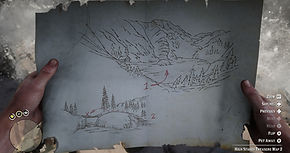
HIGH STAKES MAP #3
the clue on the map
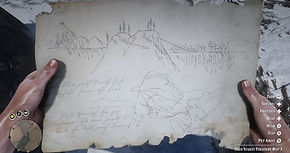
the clue in the world
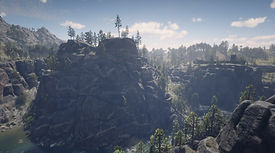
the clue's exact location
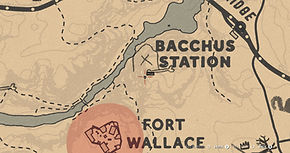
NOTES. Ride to the clifftop near Bacchus Station, just southwest of "S" in "Station" and precisely north of "F" in "Fort Wallace." Drop down to the left and continue along the path. Climb up after seeing the Rock Carving, then drop down again. Hug the wall to the left and crawl under the rock overhang. The treasure is in a hole in the wall just on the other side: three gold bars ($1,500).
The Poisonous Trail Treasure
START
This quest begins by retrieving the map inside Cairn Lodge, which is on the frozen Cairn Lake, north of "M" in "Ambarino." A good time to do it is during the Flaco Hernandez part of the Strangers mission The Noblest of Men, and a Woman II, first available during Chapter II.
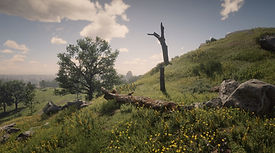
POISONOUS TRAIL MAP #1
the clue on the map
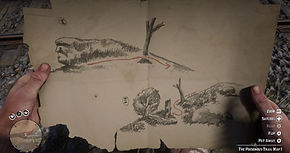
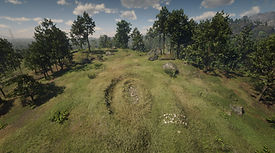
the clue in the world
the clue's exact location
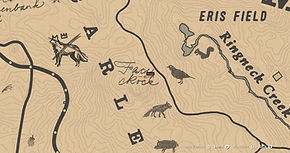
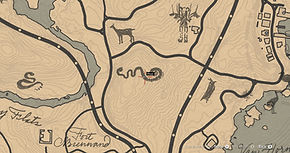
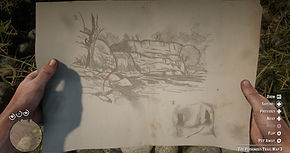
NOTES. Just south of Eris Field and north of Rhodes. Look for a vertical tree stump just behind the hill that has the three-pronged large dead tree on it. Recover a piece of jewelry and the second map.
POISONOUS TRAIL MAP #2
the clue on the map

the clue in the world
the clue's exact location
NOTES. Just west of Van Horn, find the large snake-shaped rock formation that can be inspected from the nearby wooden tower. The searchable area is in the hole around the rocks that form the serpent's "head." Recover a piece of jewelry and the third map.
POISONOUS TRAIL MAP #3
the clue on the map
the clue in the world
the clue's exact location
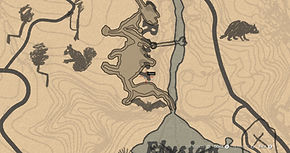
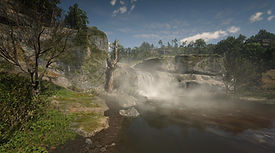
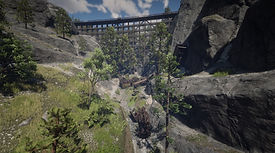
NOTES. See the screenshots gallery below. Follow the tunnel behind the Elysian Pool waterfall, just north of Butcher's Creek. Drop down into the narrow crevice at right. Crawl through the hole and go right at the fork. When you come out to a large cave, run left and jump to the ledge below. Slide down and recover the treasure from under a rock at left: four gold bars ($2,000). To leave, climb up the right side of the incline, then grab the upper ledge to your right and retrace your steps... that, or just kill yourself with dynamite and respawn outside.


The Elemental Trail Treasure
FINDING THE FIRST MAP
the location of the first map

the location of the first map

NOTES. On a body hanging from a cliff by the roadside along the Sea of Coronado, in the westernmost part of the map in Gaptooth Ridge, New Austin. If the body doesn't spawn, the map can be obtained by walking near where it should be, or sometimes even by killing any bird nearby and looting its carcass!
ELEMENTAL TRAIL MAP #1
the clue on the map

the clue in the world

the clue's exact location

NOTES. Greenhollow, the abandoned ruins east of Lake Don Julio, in the southern part of Hennigan's Stead in New Austin. Search the chimney to find the second map.
ELEMENTAL TRAIL MAP #2
the clue on the map

the clue in the world

the clue's exact location

NOTES. Ride to the clifftop near Bacchus Station, just southwest of "S" in "Station" and precisely north of "F" in "Fort Wallace." Drop down to the left and continue along the path. Climb up after seeing the Rock Carving, then drop down again. Hug the wall to the left and crawl under the rock overhang. The treasure is in a hole in the wall just on the other side: three gold bars ($1,500).
ELEMENTAL TRAIL MAP #3
the clue on the map

the clue in the world

the clue's exact location

NOTES. Ride to the clifftop near Bacchus Station, just southwest of "S" in "Station" and precisely north of "F" in "Fort Wallace." Drop down to the left and continue along the path. Climb up after seeing the Rock Carving, then drop down again. Hug the wall to the left and crawl under the rock overhang. The treasure is in a hole in the wall just on the other side: three gold bars ($1,500).
Landmarks of Riches Treasure
FINDING THE FIRST MAP
the location of the first map

the location of the first map

NOTES. Behind the plaque on the obelisk west of Owanjila Lake in West Elizabeth and just south of the Trapper's stall in Big Valley. Screenshots borrowed from IGN since I forgot to take my own this time!
LANDMARKS OF RICHES MAP #1
the clue on the map

the clue in the world

the clue's exact location

NOTES. Bluewater Marsh, just east of the abandoned town of Lakay. Climb on the roof of the Tiny Church point of interest, and search at the back of the steeple with the rusty bell. Recover a piece of jewelry and the second map.
LANDMARKS OF RICHES MAP #2
the clue on the map

the clue in the world

the clue's exact location

NOTES. Mysterious Hill Home, northwest of Bacchus Station and near the New Hanover-Ambarino border. Search behind the boarded-up window on the right side of the house. Recover a piece of jewelry and the third map.
LANDMARKS OF RICHES MAP #3
the clue on the map

the clue in the world

the clue's exact location

NOTES. Bolger Glade, south of Rhodes and east of Braithwaite Manor. Search the large tree trunk in the middle of the Civil War battlefield. Recover a piece of jewelry and the fourth map.
LANDMARKS OF RICHES MAP #4
the clue on the map

the clue in the world

the clue's exact location

NOTES. This is by far the most cryptic of all the maps. The clue points to the sundial made of rocks at the top of Mount Shann, which is a short ride away from Black Bone Forest and Pronghorn Ranch in West Elizabeth. The sundial is at the top of a large boulder that can only be climbed from the southern side. The treasure is at the foot of the dial: six gold bars ($3,000).
Le Tresor des Morts Treasure
PRE-ORDER EXCLUSIVE! Only for those who have pre-ordered the game's digital edition on any platform.
START
This quest begins by finding the first map inside the jailhouse at Limpany, the burnt-out ghost town on the Dakota River just southwest of the first gang camp at Horseshoe Overlook, in Chapter II.
TRESOR DES MORTS MAP #1
the clue on the map

the clue in the world
the clue's exact location
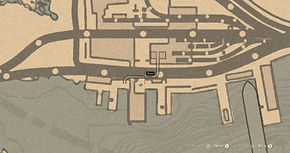
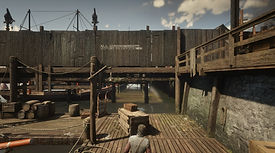
NOTES. Saint Denis, on the westernmost part of the docks. Find the Cornwall warehouse on the pier that reads "All consignments report to office." Wade in the water hugging the right-hand wall until you come to an iron gate. Enter the dark tunnel and find the next clue by the wall on the left, on top of a crate with a lantern on it.
TRESOR DES MORTS MAP #2
the clue on the map
the clue in the world
the clue's exact location
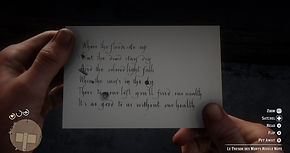
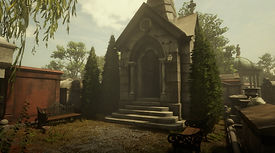
NOTES. This note is not a map, but a riddle pointing to the mausoleum in the Saint Denis cemetery, the only one with a stained glass window. This is right across from where Arthur intercepts the grave robbers during the Chapter IV main story mission Angelo Bronte, a Man of Honor. The treasure is in a tomb on the left side of the mausoleum: six gold bars ($3,000).
Unmapped and Other Treasures
While these do not count for the Explorer challenges, they are still sizeable enough to count as "treasures" and/or require interpreting a map in order to be found.
STRANGE STATUES TREASURE
the clue at Window Rock

the location of the Strange Statues

the Strange Statues on the map

NOTES. You can find the clue at Window Rock, the natural hollow rock formation just south of Granite Pass in Ambarino. It shows some strange statues and a seeming number sequence, indicated in what appear to be turkey feathers. The strange statues themselves are in a cave southeast of "I" in "Ambarino" and just north of the Mysterious Hill Home. The cave's entrance is hidden by some large boulders and vegetation. Inside the cave, press the button on the statues with a prime number of fingers: 2, 3, 5, and 7; they're easily visible against the light shining through a hole in the ceiling. The button order doesn't matter. You can reset a button by pressing the one in the back of its statue. One of statues has a missing arm, which is on the floor nearby, and the fingers on that arm must be considered in the count, too. Once all four buttons have been pressed, a sliding door at the base of the center statue will reveal the treasure: three gold bars ($1,500).
TRAIN WRECK TREASURE
exact location of the train wreck treasure

NOTES. The wreck is available from Chapter II and it's unrelated to the train that crashes in a similar spot in Chapter VI. This one is at the bottom of a ravine in the state of Ambarino, at the exact border of Grizzlies East and West. In the horizontal yellow train is a large jewelry bag and some cash inside a chest. To enter the vertical yellow train car, instead, walk past it and grab the ledge above you on the left, right where a steep upward incline is between two boulders. Turn around, jump across to the other flat rock, and from there jump straight into the train car. At the bottom of it are two gold bars ($1,000). The chest loot respawns every chapter; the gold bars only in the epilogue.
REED COTTAGE TREASURE (SKETCHED MAP)
the clue on the map

the clue in the world

the clue's exact location

NOTES. Find the Sketched Map inside the fireplace in Reed Cottage, in the Black Balsam Rise region of New Hanover, just east of the "N" in "Roanoke Ridge." The map points to a spot on the mesa overlooking the western shore of Elysian Pool, just south of Reed Cottage. Start from the tall tree and face east, take 20 steps forward, and then 5 steps right. At the foot of the boulder is one gold ingot ($300).